Physical Address
304 North Cardinal St.
Dorchester Center, MA 02124
Physical Address
304 North Cardinal St.
Dorchester Center, MA 02124
→ GUI for detecting objects using color information with OpenCV and Tkinter.
When you see the title, you might be surprised or think that I am some kind of fraud. I am not a fraud, because it will be a simple detector, not like popular object detection models such as YOLO, SSD, and Faster R-CNN. These deep learning models are powerful, and they can detect different kinds of objects under complex scenes, but they require a lot of data, computational power, and time.
By using classical computer vision approaches, we will create a simple object detector. Detection will be made by following the color pattern of an object. It will be a simple detector, and it will work under basic environments like the sky, where the background is clear and doesn’t contain different colors.
There are different color spaces that you can use in OpenCV. The most popular ones are:
In this article, we will focus on HSV color space

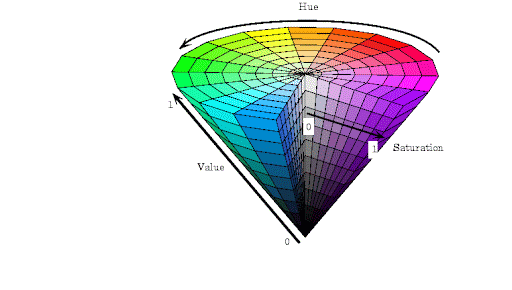
HSV stands for Hue, Saturation, and Value. It is a color space representation that is often used in image processing and computer vision tasks.
The advantages of using the HSV color space for color selection are that it allows for easy manipulation of hue, saturation, and value. However, a disadvantage is that it may not accurately represent all colors.(source)
If you look at this image carefully, you will notice that you cannot obtain all the colors.

findContours function.
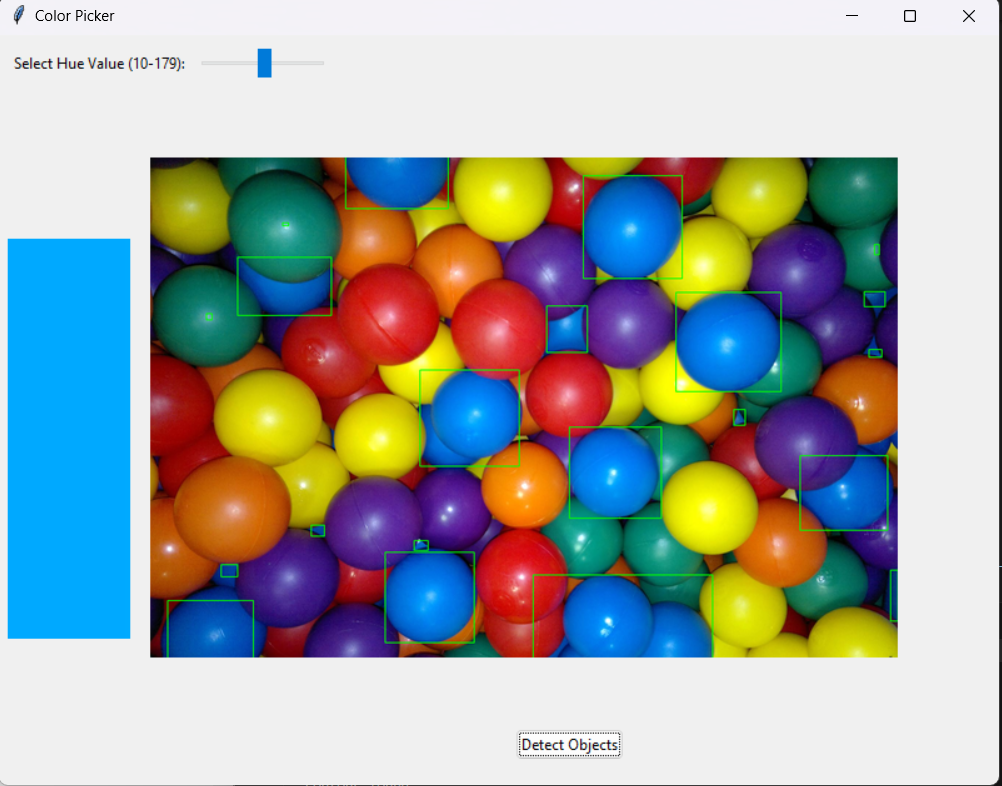
Okay, now it is time for coding. I explained most of the code with comment lines. Actually, this code represents the four steps mentioned above, plus some code for creating a simple graphical user interface with Tkinter.
import cv2
import numpy as np
import tkinter as tk
from tkinter import ttk
from PIL import Image, ImageTk

class ColorPickerApp:
    def __init__(self, master):
        self.master = master
        self.master.title("Color Picker")
        self.master.geometry("800x600")  # Adjust the size of the window

        # Create a frame to hold the color bar and color image
        self.color_bar_frame = tk.Frame(master)
        self.color_bar_frame.pack(side="top", fill="x", padx=5, pady=5)

        self.hue_label = ttk.Label(self.color_bar_frame, text="Select Hue Value (10-179):")
        self.hue_label.pack(side="left", padx=5, pady=5)

        self.hue_scale = ttk.Scale(self.color_bar_frame, from_=10, to=179, orient="horizontal", command=self.update_color)
        self.hue_scale.pack(side="left", padx=5, pady=5)

        # Create a canvas for the color image
        self.canvas_color = tk.Canvas(master, width=100, height=320)
        self.canvas_color.pack(side="left", padx=5, pady=75)

        # Create a canvas for the image
        self.canvas_image = tk.Canvas(master, width=800, height=400)
        self.canvas_image.pack(side="top", padx=5, pady=50)

        self.detect_button = ttk.Button(master, text="Detect Objects", command=self.detect_objects)
        self.detect_button.pack(side="top", padx=5, pady=5)

        self.image = None
        self.image_rgb = None
        self.image_hsv = None

        # Video capture
        self.cap = cv2.VideoCapture("fish.mp4")  # Change to 0 for webcam, or provide path for video file

        # Load the initial frame
        self.load_frame()

    def load_frame(self):
        ret, frame = self.cap.read()
        if ret:
            self.image = frame
            self.image_rgb = cv2.cvtColor(frame, cv2.COLOR_BGR2RGB)
            self.image_hsv = cv2.cvtColor(frame, cv2.COLOR_BGR2HSV)

            # Display the frame with detected regions
            self.display_frame(self.image_rgb)
            self.master.after(100, self.load_frame)  # Continue to load frames

    def update_color(self, value):
        hue_value = int(float(value))
        color_image = np.zeros((400, 100, 3), dtype=np.uint8)
        color_image[:, :] = (hue_value, 255, 255)
        color_image_rgb = cv2.cvtColor(color_image, cv2.COLOR_HSV2RGB)
        color_image_rgb = Image.fromarray(color_image_rgb)

        # Display the color image
        color_image_tk = ImageTk.PhotoImage(image=color_image_rgb)
        self.canvas_color.create_image(0, 0, anchor="nw", image=color_image_tk)
        self.canvas_color.image = color_image_tk


    def display_frame(self, frame):
        img = Image.fromarray(frame)

        # Get the original frame dimensions
        frame_width, frame_height = img.size


         # Define maximum width and height
        max_width = 600
        max_height = 300

        # Calculate target width and height
        target_width = min(frame_width, max_width)
        target_height = min(frame_height, max_height)

        # Calculate aspect ratio
        aspect_ratio = frame_width / frame_height

        # Adjust dimensions if necessary to fit within limits
        if aspect_ratio > max_width / max_height:
            target_width = max_width
            target_height = int(target_width / aspect_ratio)
        else:
            target_height = max_height
            target_width = int(target_height * aspect_ratio)


        # Resize the frame while maintaining the aspect ratio
        img = img.resize((target_width, target_height), Image.LANCZOS)

        # Convert the resized frame to PhotoImage
        img = ImageTk.PhotoImage(image=img)


        # Clear previous frame and display the resized frame
        self.canvas_image.delete("all")
        self.canvas_image.create_image(0, 0, anchor="nw", image=img)
        self.canvas_image.image = img

    def detect_objects(self):
        if self.image is None:
            return

        print("detecting objects")
        # Define the hue range based on the current value of the hue scale
        hue_value = int(self.hue_scale.get())
        lower_limit = np.array([hue_value - 8, 100, 100])
        upper_limit = np.array([hue_value + 8, 255, 255])

        # Create a mask to detect objects within the specified hue range
        mask = cv2.inRange(self.image_hsv, lower_limit, upper_limit)
        contours, _ = cv2.findContours(mask, cv2.RETR_EXTERNAL, cv2.CHAIN_APPROX_SIMPLE)

        # Draw rectangles around the detected objects
        for contour in contours:
            print("contour found")
            #if cv2.contourArea(contour) > 50:
            x, y, w, h = cv2.boundingRect(contour)
            cv2.rectangle(self.image_rgb, (x, y), (x + w, y + h), (255, 255, 0), 5)

        # Display the updated frame with detected objects
        self.display_frame(self.image_rgb)

        # Call detect_objects again after a delay
        self.master.after(50, self.detect_objects)


def main():
    root = tk.Tk()
    app = ColorPickerApp(root)
    root.mainloop()


if __name__ == "__main__":
    main()