Physical Address
304 North Cardinal St.
Dorchester Center, MA 02124
Physical Address
304 North Cardinal St.
Dorchester Center, MA 02124
→ Step-by-step guide for calibration of any camera with OpenCV in Python
Camera calibration can be thought of as a process to obtain a less distorted images. After the calibration process is done, you will have two different parameter sets that are specific to your camera: the first is intrinsic parameters, and the second is distortion parameters. By using these two parameter sets, you will obtain images that look more like what you see with your eyes rather than distorted images.

Basically, by using intrinsic and distortion parameters, the process of projection of 3D points (real world) to 2D points (image) becomes more accurate. Think of this as taking a photo with your phone and displaying it on your screen, and this calibration process helps to correct image distortions.
I want to point out that this process is not mainly about the projection of 3D points (real world) to 2D points (image). It is just an additional step for preventing distortions. For projection, the camera matrix and projection equations are used. I will talk about these in later articles.
Also, I have a YouTube video about this article, you can watch it.
You don’t need much:
After the calibration is finished, there will be two different parameter sets.
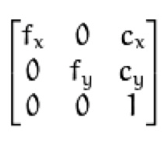
fx, fy: focal lengths in pixels along x and y axes
cx, cy: coordinates of the principal point

Radial distortion: k1,k2,k3
Tangential distortion: p1,p2

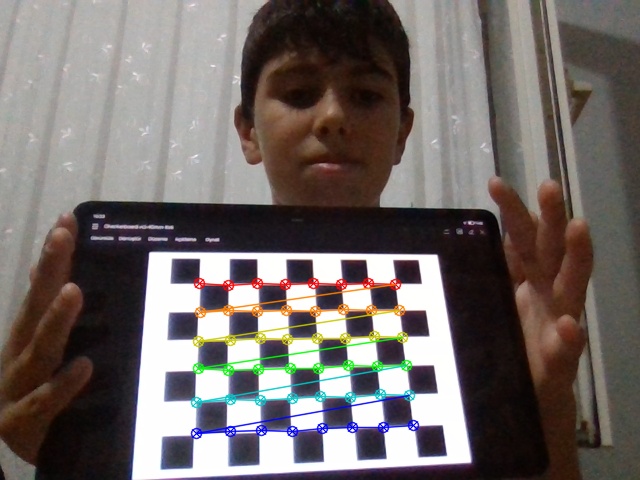
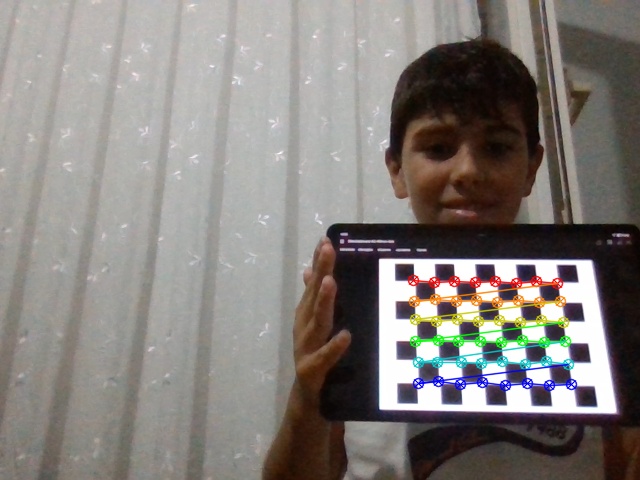
In the end, I will show you how to save all these parameters in a YAML file to use later. You can see the result of my camera calibration in the image below.

I created two different Python files: the first one is for collecting chessboard photos, and the second is for the calibration and parameter-saving process.
As I told you before, I am going to use a chessboard image that I downloaded to a tablet. A more common way is to print out the chessboard on paper, but you can choose whichever method you want.
After executing this script, you will see corners drawn on your chessboard. Press space to save these images. You need to collect images from different orientations and scales for better results.
import cv2
import os

"""
Collect images for camera calibration using a chessboard pattern
This script captures images from the webcam and saves them for calibration, but you can use this with any camera.
"""

# Directory to save images
SAVE_DIR = "calib_images"
# Number of images, use at least 15-20 images
NUM_IMAGES = 15
# How many inner corners per chessboard row and column, not squares (IMPORTANT !!!)
CHESSBOARD_SIZE = (8, 6)

os.makedirs(SAVE_DIR, exist_ok=True)

# 0 = default webcam, if you have additional cameras, you can change this index
cap = cv2.VideoCapture(0)
count = 0 # image counter

while True:
    ret, frame = cap.read()
    if not ret:
        break

    display = frame.copy()
    gray = cv2.cvtColor(frame, cv2.COLOR_BGR2GRAY)

    #  Find chessboard corners with findChessboardCorners function
    found, corners = cv2.findChessboardCorners(gray, CHESSBOARD_SIZE, None)

    # If any corners are found, draw them
    if found:
        cv2.drawChessboardCorners(display, CHESSBOARD_SIZE, corners, found)
        cv2.putText(display, "Press SPACE to save", (10, 30),
                    cv2.FONT_HERSHEY_SIMPLEX, 1, (0, 255, 0), 2)

    cv2.imshow("Webcam", display)
    key = cv2.waitKey(1)

    # If SPACE is pressed and corners are found, save the image
    if key == 32 and found:
        filename = os.path.join(SAVE_DIR, f"img_{count:02d}.jpg")
        cv2.imwrite(filename, frame)
        print(f"Saved {filename}")
        count += 1
        # If image number reaches the limit, stop the process
        if count >= NUM_IMAGES:
            break

    # If ESC is pressed, exit the loop
    elif key == 27:
        break

cap.release()
cv2.destroyAllWindows()

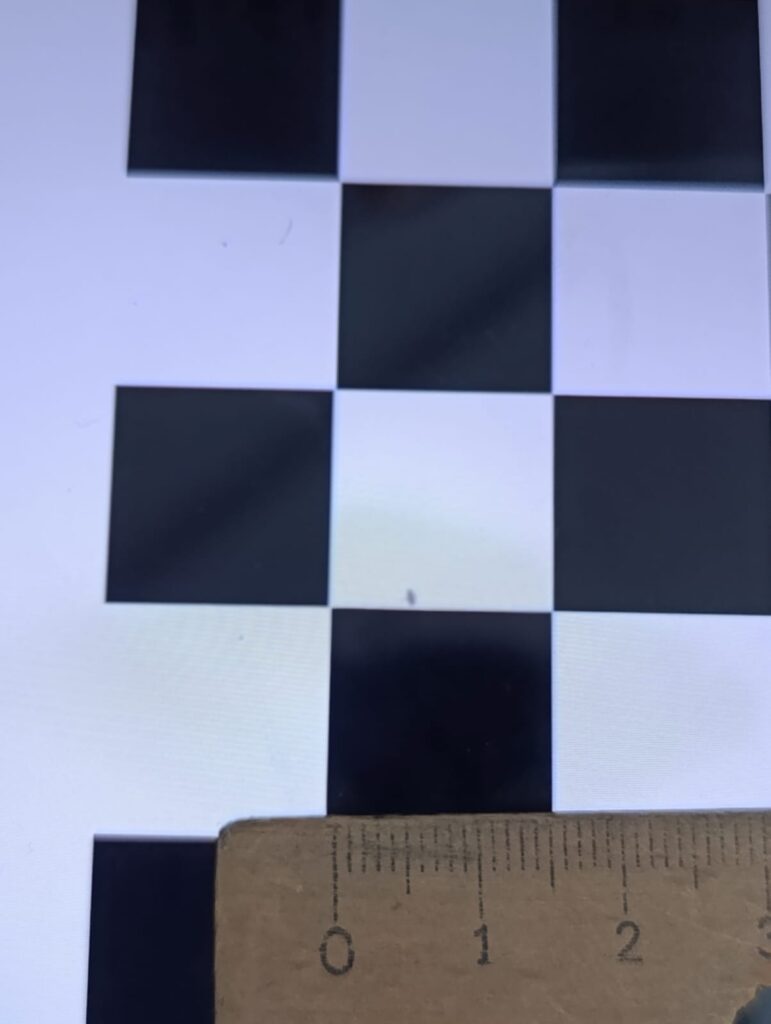
After collecting images, it is time for calibration. Before starting, you need to find the length of a square in your chessboard image. I measured it with a ruler; you can see it in the SQUARE_SIZE variable. You can choose any units (meter, centimeter, millimeter); you just need to stick with what you choose.
That was very hard to hold the ruler, the chessboard, and the camera at the same time; that is why the ruler is not straight, but I perfectly measured it and found 17 mm on my chessboard. Look at the image below.

And don’t forget, CHESSBOARD_SIZE refers to the number of inner corners per chessboard row and column, not the number of squares.
import numpy as np
import cv2
import glob
import yaml

"""
After capturing images of a chessboard pattern, this script calibrates the camera
and saves the calibration parameters to a YAML file.
"""

# Chessboard settings
CHESSBOARD_SIZE = (8, 6)
SQUARE_SIZE = 17  # mm

# Prepare object points based on the chessboard size and square size
# objp will hold the 3D coordinates of the chessboard corners in the world space
objp = np.zeros((CHESSBOARD_SIZE[0]*CHESSBOARD_SIZE[1], 3), np.float32)

# Generate the grid points in the chessboard pattern
# objp[:, :2] will hold the x, y coordinates of the corners
objp[:, :2] = np.mgrid[0:CHESSBOARD_SIZE[0], 0:CHESSBOARD_SIZE[1]].T.reshape(-1, 2)

# Scale the points by the size of each square
objp *= SQUARE_SIZE

# Arrays to store points
objpoints = []  # 3D points
imgpoints = []  # 2D points

# Load images from the specified directory
images = glob.glob("calib_images/*.jpg")

for fname in images:
    img = cv2.imread(fname)
    gray = cv2.cvtColor(img, cv2.COLOR_BGR2GRAY)

    # Find the chessboard corners
    found, corners = cv2.findChessboardCorners(gray, CHESSBOARD_SIZE, None)

    # If corners are found, continue
    if found:
        objpoints.append(objp)
        # Refine the corner locations
        corners2 = cv2.cornerSubPix(
            gray, corners, (11, 11), (-1, -1),
            (cv2.TERM_CRITERIA_EPS + cv2.TERM_CRITERIA_MAX_ITER, 30, 0.001)
        )
        # Append the refined corners to imgpoints list
        imgpoints.append(corners2)

# Calibrate the camera using the collected object points and image points
ret, mtx, dist, rvecs, tvecs = cv2.calibrateCamera(
    objpoints, imgpoints, gray.shape[::-1], None, None
)

# print the calibration results
print("Camera matrix:\n", mtx)
print("Distortion coefficients:\n", dist)
print("Reprojection error:", ret)


calib_data = {
    "camera_matrix": mtx.tolist(),
    "dist_coeff": dist.tolist(),
    "reprojection_error": float(ret)
}

# Save the calibration data to a YAML file
with open("calibration.yaml", "w") as f:
    yaml.dump(calib_data, f)

print("Saved calibration.yaml")
