Physical Address
304 North Cardinal St.
Dorchester Center, MA 02124
Physical Address
304 North Cardinal St.
Dorchester Center, MA 02124
→ Article about detecting objects with pretrained OpenCV Cascade Classifiers implemented in Python.
For Object Detection, there are popular models like YOLO, Faster R-CNN, and SSD, and they all have different advantages:
But these advanced models are not the only choices for object detection. These models are powerful, but training and running them are computationally expensive and time-consuming.
You have other options like OpenCV cascade classifiers; they are not complex models, therefore you don’t need powerful GPUs or anything else. You just need to install the OpenCV library, and with a few simple lines of code, you’re good to go.
Before starting, I must warn you: OpenCV Cascade Classifiers are not powerful models. Most of the time, they won’t be enough for you, but if you have a simple task like face detection, body detection, or eye detection, you can use OpenCV Cascade Classifiers.

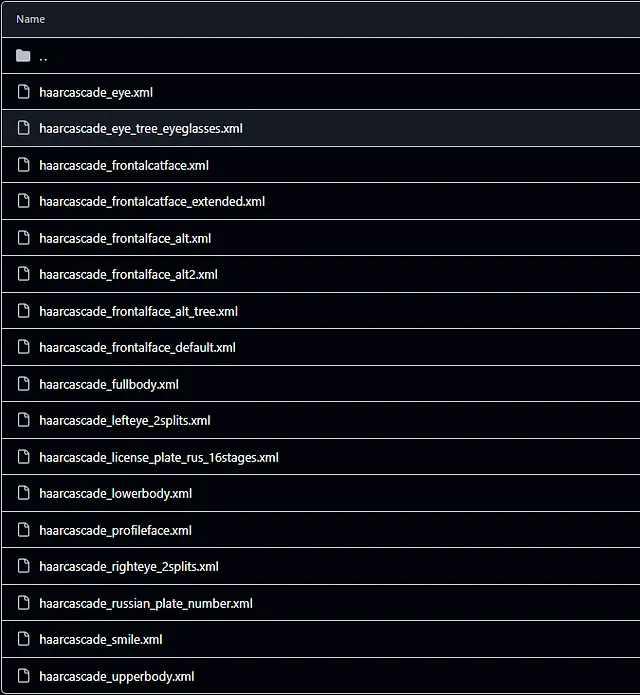
There are a bunch of pretrained models that OpenCV has published on their official repository, and you can take a look at the models from the image below. (pretrained models)
Most of the pretrained models are for body, eye, and face detection.

For loading a pretrained model, you need to create an object of the cv2.CascadeClassifier class and provide the pretrained model file as a parameter.
For detection, use the detectMultiScale method, and here is the explanation of the parameters:
minNeighbors controls how many detections around the same region are needed to declare if it is an object.
import cv2
import matplotlib.pyplot as plt

# Load the pre-trained Haar Cascade classifier for face detection
face_cascade = cv2.CascadeClassifier(cv2.data.haarcascades + 'haarcascade_fullbody.xml')

# Read the image
image = cv2.imread(r"C:\Users\sirom\Downloads\pexels-chinmay-singh-251922-843563.jpg")

# Convert the image to grayscale
gray = cv2.cvtColor(image, cv2.COLOR_BGR2GRAY)

# Detect faces in the image
faces = face_cascade.detectMultiScale(gray, scaleFactor=1.1, minNeighbors=5, minSize=(10, 10))

# Draw rectangles around the detected faces
for (x, y, w, h) in faces:
    cv2.rectangle(image, (x, y), (x+w, y+h), (255, 0, 0), 2)

# Display the output
plt.imshow(cv2.cvtColor(image,cv2.COLOR_BGR2RGB))

Nearly everything is the same as in the image, and don’t forget to change:
# Load the pre-trained Haar Cascade classifier for full body detection (you can use a face detector if needed)
face_cascade = cv2.CascadeClassifier(cv2.data.haarcascades + 'haarcascade_fullbody.xml')

# Capture video from a file or camera (use 0 for the default camera)
video_capture = cv2.VideoCapture(r"C:\Users\sirom\Downloads\7236898-hd_1280_720_25fps.mp4")  # For a file
# video_capture = cv2.VideoCapture(0)  # For camera input

# Start the time counter
prev_frame_time = time.time()
new_frame_time = 0

# Loop over frames from the video
while video_capture.isOpened():
    # Capture frame-by-frame
    ret, frame = video_capture.read()

    if not ret:
        print("Finished processing or cannot read the video.")
        break

    # Convert the frame to grayscale
    gray = cv2.cvtColor(frame, cv2.COLOR_BGR2GRAY)

    # Detect faces in the frame
    faces = face_cascade.detectMultiScale(gray, scaleFactor=1.1, minNeighbors=10, minSize=(10, 10))

        """
    Explanation of parameters
    - gray: The input image in grayscale.
    - scaleFactor: Parameter specifying how much the image size is reduced at each image scale.
    - minNeighbors: Parameter specifying how many neighbors each candidate rectangle should have to retain it.
    - minSize: Minimum possible object size. Objects smaller than that are ignored.
    """

    # Draw rectangles around the detected faces
    for (x, y, w, h) in faces:
        cv2.rectangle(frame, (x, y), (x + w, y + h), (255, 0, 0), 4)
        cv2.putText(frame, 'Face', (x + 75, y - 10), cv2.FONT_HERSHEY_SIMPLEX, 0.9, (255, 0, 0), 2)


    # Calculate the FPS
    new_frame_time = time.time()
    fps = 1 / (new_frame_time - prev_frame_time)
    prev_frame_time = new_frame_time

    # Convert FPS to an integer for display
    fps = int(fps)
    fps_text = f'FPS: {fps}'

    # Put the FPS text on the top-right corner of the frame
    cv2.putText(frame, fps_text, (frame.shape[1] - 150, 50), cv2.FONT_HERSHEY_SIMPLEX, 1, (0, 255, 0), 3)

    # Display the resulting frame
    cv2.imshow('Face Detection in Video with FPS', frame)

    # Break the loop when 'q' is pressed
    if cv2.waitKey(1) & 0xFF == ord('q'):
        break

# Release the video capture object and close all windows
video_capture.release()
cv2.destroyAllWindows()
Okay, that’s it from me. I hope you liked it, and if you have any questions, feel free to ask me (siromermer@gmail.com)