Physical Address
304 North Cardinal St.
Dorchester Center, MA 02124
Physical Address
304 North Cardinal St.
Dorchester Center, MA 02124
We all know how powerful the SAM family is, with simple prompts, precise segmentation can be performed. In 2023, it started with SAM, by providing positional prompts, segmentation on images was performed. Later, SAM2 was released and it enabled tracking objects in videos with the same kind of prompts as SAM. In late 2025 last but not least SAM3 was released, and it literally shook the ground; with a text prompt, segmentation was performed both on videos and images. These models are powerful; but not for everyone. Running these models requires a decent amount of computational power (specifically VRAM). I couldn’t even load the latest SAM3 model on my old GPU, because of the memory requirements. But of course; this isn’t the end of the world; because for both SAM2 and SAM3 the lightest version was released, and in this article, we will look at edgeTAM, a simpler version of SAM2 that can run with limited resources.

Based on the GitHub repository, edgeTAM runs 22× faster than SAM2. This is a massive improvement from the perspective of performance, but of course accuracy values are not as good as SAM2. By the way, as I said in the introduction, there is a light version of SAM3 as well, named efficientsam3 (new article alert 🙂

First, I will show how to create a proper environment for running edgeTAM models, then show you how to run edgeTAM on images and videos. On videos, by giving a single prompt, you can track objects as well (not exactly tracking, we will see in a minute).
First create an Anaconda environment, you can name it whatever you want. You need to install:
python>=3.10torch>=2.3.1torchvision>=0.18.1You can follow my other article about creating a GPU-supported PyTorch environment from here, or follow the PyTorch documentation. But the next steps require compiling a custom CUDA kernel with the nvcc compiler, so it is better if you follow my article 🙂
After that, clone the repository, and install the other requirements using the below lines:
git clone https://github.com/facebookresearch/EdgeTAM.git
cd EdgeTAM

pip install -e ".[notebooks]"
You can see there are some warnings in the below image, you can read the full documentation from here.

Let’s start coding 🙂
You can directly use the notebook files inside EdgeTAM/notebooks for running the model on images and videos. There are different demos:
Now, I will show you these one by one. First, lets start with segmenting objects from images.
Let’s start with importing necessary libraries, and check if CUDA is available:
import os
os.environ["PYTORCH_ENABLE_MPS_FALLBACK"] = "1"
import numpy as np
import torch
import matplotlib.pyplot as plt
from PIL import Image

# Set device to GPU if available, otherwise use CPU
if torch.cuda.is_available():
    device = torch.device("cuda")
elif torch.backends.mps.is_available():
    device = torch.device("mps")
else:
    device = torch.device("cpu")
print(f"Using device: {device}") # GPU in my case
Now, let’s define a few functions for displaying the prompts and mask output.
# Functions for visualizing masks, points, and bounding boxes
def show_mask(mask, ax, random_color=False):
    color = np.concatenate([np.random.random(3), [0.6]], axis=0) if random_color else np.array([30/255, 144/255, 255/255, 0.6])
    h, w = mask.shape[-2:]
    mask_image = mask.reshape(h, w, 1) * color.reshape(1, 1, -1)
    ax.imshow(mask_image)

def show_points(coords, labels, ax, marker_size=200):
    pos_points = coords[labels==1]
    neg_points = coords[labels==0]
    ax.scatter(pos_points[:, 0], pos_points[:, 1], color='green', marker='*', s=marker_size, edgecolor='white', linewidth=1.25)
    ax.scatter(neg_points[:, 0], neg_points[:, 1], color='red', marker='*', s=marker_size, edgecolor='white', linewidth=1.25)

def show_box(box, ax):
    x0, y0 = box[0], box[1]
    w, h = box[2] - box[0], box[3] - box[1]
    ax.add_patch(plt.Rectangle((x0, y0), w, h, edgecolor='green', facecolor=(0, 0, 0, 0), lw=2))

Load the model and config file. You can find the config file from EdgeTAM\sam2\configs\edgetam.yaml
# Load model for image segmentation
from sam2.build_sam import build_sam2
from sam2.sam2_image_predictor import SAM2ImagePredictor

checkpoint = "../checkpoints/edgetam.pt"
model_cfg = "edgetam.yaml"

model = build_sam2(model_cfg, checkpoint, device=device)
image_predictor = SAM2ImagePredictor(model)
Now, let’s read the image and load the image to the model.
# Load image
image = Image.open('images/elephants.jpg')
image = np.array(image.convert("RGB"))

# Set image for prediction
image_predictor.set_image(image)

You can define different types of prompts, like:
Now, lets try to segment elephant in the middle with point prompts.
# Positive + Negative points
input_point = np.array([[600, 400], [1100, 600]])
input_label = np.array([1, 0])  # 1=positive (include), 0=negative (exclude)

masks, scores, _ = image_predictor.predict(
    point_coords=input_point,
    point_labels=input_label,
    multimask_output=False,
)

plt.figure(figsize=(10, 6))
plt.imshow(image)
show_mask(masks[0], plt.gca())
show_points(input_point, input_label, plt.gca())
plt.axis('off')
plt.show()

Now, lets see if we can segment elephant in the right with box prompt.
# Box prompt
input_box = np.array([800, 300, 1250, 600])

masks, scores, _ = image_predictor.predict(
    box=input_box[None, :],
    multimask_output=False,
)

plt.figure(figsize=(10, 6))
plt.imshow(image)
show_mask(masks[0], plt.gca())
show_box(input_box, plt.gca())
plt.title('Box Prompt')
plt.show()

Even though box prompt is not perfect, segmentation is still successful. You can see an examples for combining these prompts (positive and negative point, bbox) in a single image from image_predictor_example.ipynb notebook.
Now, let’s see how to track(?) objects on videos using edgeTAM. Again, we will define positional prompts before inference, and later the model will work on frames one by one.
Note: Implementation requires saving frames one by one to a folder, then load all images to the model, then perform inference. This isn’t a tracker at all, but it is how it is implemented. There are different solutions, I will talk about them later in this article.
# Load video predictor
from sam2.build_sam import build_sam2_video_predictor

video_predictor = build_sam2_video_predictor(model_cfg, checkpoint, device=device)
Save frames into a folder, you can use ffmpeg or OpenCV for this. For example, using ffmpeg:
ffmpeg -i videos/cat.mp4 -q:v 2 -start_number 0 <videos/cat>/'%05d.jpg'
Now, using the first frame, we will define prompts, and the model will process all frames one by one.
# 3 different point prompts for segmenting cat
ann_frame_idx = 0
ann_obj_id = 1

points = np.array([[400, 250], [500, 220], [700,480]], dtype=np.float32)
labels = np.array([1, 1,1], np.int32)

_, out_obj_ids, out_mask_logits = video_predictor.add_new_points_or_box(
    inference_state=inference_state,
    frame_idx=ann_frame_idx,
    obj_id=ann_obj_id,
    points=points,
    labels=labels,
)

# Show annotation on first frame
plt.figure(figsize=(10, 6))
plt.imshow(Image.open(os.path.join(video_dir, frame_names[ann_frame_idx])))
show_points(points, labels, plt.gca())
show_mask((out_mask_logits[0] > 0.0).cpu().numpy(), plt.gca())
plt.title(f'Frame {ann_frame_idx} - Annotated')
plt.show()
Now, propagate through video
# Propagate through video
video_segments = {}
for out_frame_idx, out_obj_ids, out_mask_logits in video_predictor.propagate_in_video(inference_state):
    video_segments[out_frame_idx] = {
        out_obj_id: (out_mask_logits[i] > 0.0).cpu().numpy()
        for i, out_obj_id in enumerate(out_obj_ids)
    }

Last demo is for segmenting all parts of the image without any prompt. Depending on your GPU, this might take a some time.
# Load automatic mask generator
from sam2.automatic_mask_generator import SAM2AutomaticMaskGenerator

mask_generator = SAM2AutomaticMaskGenerator(
    model=build_sam2(model_cfg, checkpoint, device=device, apply_postprocessing=False)
)
Now, let’s read the input image and run the model.
# Load image
image = Image.open('images/elephants.jpg')
image = np.array(image.convert("RGB"))

# Generate masks automatically
masks = mask_generator.generate(image)
print(f"Generated {len(masks)} masks")
Lets visualize the output:
# Visualize all masks
def show_anns(anns):
if len(anns) == 0:
return
sorted_anns = sorted(anns, key=(lambda x: x['area']), reverse=True)
ax = plt.gca()
ax.set_autoscale_on(False)
img = np.ones((sorted_anns[0]['segmentation'].shape[0], sorted_anns[0]['segmentation'].shape[1], 4))
img[:, :, 3] = 0
for ann in sorted_anns:
m = ann['segmentation']
color_mask = np.concatenate([np.random.random(3), [0.5]])
img[m] = color_mask
ax.imshow(img)
plt.figure(figsize=(12, 8))
plt.imshow(image)
show_anns(masks)
plt.axis('off')
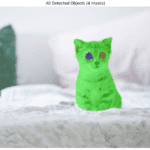
plt.title(f'All Detected Objects ({len(masks)} masks)')
plt.show()
Look at the eyes of the cat, it scares me 🙂