Generative models have always been an interesting topic for both researchers and everyday users. Even without noticing it, everybody generates images, edits images with AI, shares them with friends, has fun, and sometimes creates surprisingly realistic content. Today, there are many popular generative models and architectures, such as DALL·E, Stable Diffusion, Imagen, Midjourney, and FLUX. Even when you create images with multimodal models like ChatGPT, Gemini, or Claude, generative models are used under the hood. In this article, I will show you how to generate images with Stable Diffusion models locally using a GPU.
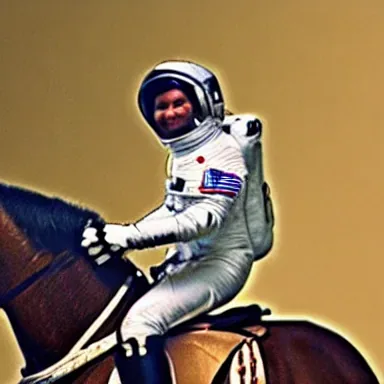
Stable Diffusion v1.4, prompt "a photograph of an astronaut wearing a hat, riding a horse"
First I will show how to create a GPU-supported (CUDA) environment for running Stable Diffusion Models, and then share the code for generating images. But before these, let's briefly talk about Stable Diffusion.
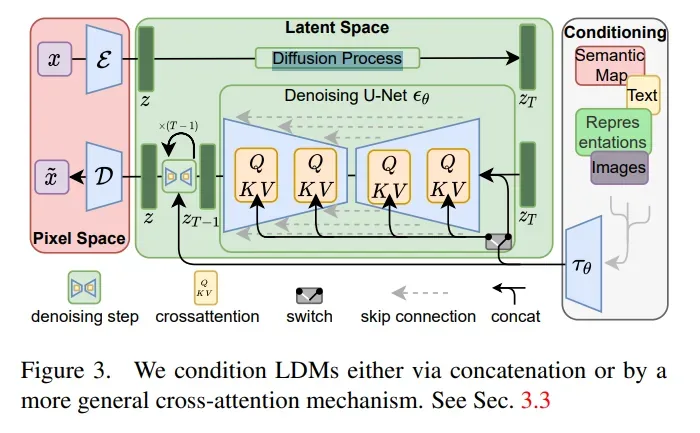
Latent Diffusion Model architecture, from the Stable Diffusion paper
Source: High-Resolution Image Synthesis with Latent Diffusion Models
Look at the image above. There is a lot going on. Unlike pixel-space diffusion models, Stable Diffusion works in latent space. Latent space is basically a lower-dimensional representation of the original image, so working in this space is faster and more computationally efficient.
At the center of Stable Diffusion, there is a U-Net (you might have seen this architecture in segmentation models). You can also see the Query, Key, and Value vectors. The Query comes from the latent representation, while the Key and Value come from external conditioning data. This could be another image, a representation, or a text prompt (see the right part of the image). For text-to-image generation, the prompt is encoded into a text representation and injected into the U-Net through cross-attention layers.
At a high level, this is how Stable Diffusion works. For more information, you can read the original paper: https://arxiv.org/pdf/2112.10752
Also, I have a YouTube video about this article, you can watch it.
Create a GPU Environment for Stable Diffusion
Let's start with creating the environment. I will use Miniconda, same as I do in my other articles.
conda create -n stable-diffusion python=3.10 -y
conda activate stable-diffusion
Now install PyTorch with CUDA support, I used CUDA 12.6, you can use any other version like 11.8, 12.1, 12.3, 12.9, 13.0. If you get any errors, you can follow this article, I explained everything starting from NVIDIA Driver installation.
pip install torch torchvision --index-url https://download.pytorch.org/whl/cu126Next, install Diffusers and a few more packages:
pip install diffusers transformers accelerate safetensors pillow jupyter ipykernel huggingface_hubYou can verify CUDA like this:
import torch
print(torch.__version__, torch.cuda.is_available())
If it prints True, you are good to go.
Download Model Weights
I will use CompVis/stable-diffusion-v1-4. You can download it directly with the huggingface_hub CLI. I only download the fp16 weights, they are smaller and my GPU doesn't have enough memory for the fp32 ones anyway:
python -m pip install -U huggingface_hub
python -c "from huggingface_hub import snapshot_download; snapshot_download(repo_id='CompVis/stable-diffusion-v1-4', local_dir=r'C:\Users\sirom\checkpoints\stable-diffusion-v1-4', allow_patterns=['model_index.json','*.json','*.txt','*.fp16.safetensors'])"
After download, your folder should look like this:
checkpoints/stable-diffusion-v1-4/
  model_index.json
  scheduler/
  text_encoder/
  tokenizer/
  unet/
  vae/
  ...
You can also download the model automatically, just give the model id instead of a local path:
from diffusers import StableDiffusionPipeline
import torch

model_path = "CompVis/stable-diffusion-v1-4"   # Hugging Face model id instead of a local path

pipe = StableDiffusionPipeline.from_pretrained(
    model_path,
    torch_dtype=torch.float32,  # GTX 16xx: avoids the fp16 UNet NaN problem
    safety_checker=None,        # skip NSFW checker (saves VRAM)
    requires_safety_checker=False,
)

pipe.enable_attention_slicing()      # lower peak VRAM
pipe.enable_model_cpu_offload()      # keep inactive modules on CPU
The weights are downloaded on the first run
Okay, now we can run the model.
Run Stable Diffusion Locally with Diffusers
I created a fresh notebook for this, you can use a python file as well, don't forget to activate the environment.
First, load the pipeline:
import torch
from diffusers import StableDiffusionPipeline
from IPython.display import display

model_path = "../checkpoints/stable-diffusion-v1-4"  # local CompVis weights
prompt = "a photograph of an astronaut wearing a hat, riding a horse"

pipe = StableDiffusionPipeline.from_pretrained(
    model_path,
    torch_dtype=torch.float32,  # GTX 16xx: fp16 UNet produces NaN images
    variant="fp16",             # still load local *.fp16.safetensors files
    safety_checker=None,        # skip NSFW checker (saves VRAM)
    requires_safety_checker=False,
    local_files_only=True,
)
pipe.enable_attention_slicing()      # lower peak VRAM
pipe.enable_model_cpu_offload()      # keep inactive modules on CPU
A few important notes here:
torch_dtype=torch.float32is important. I first triedfloat16since it's supposed to be faster and use less VRAM, but on my GPU (GTX 1660ti Max-Q) it gave me completely black/NaN images. Loading the fp16 weight files but computing in float32 fixed it.enable_attention_slicing()andenable_model_cpu_offload()are what actually make this runnable on 6 GB. Without them I got CUDA out of memory immediately.safety_checker=Noneskips loading the NSFW checker model, this reduces memory usage as well.
Now let's generate an image:
image = pipe(
    prompt,
    num_inference_steps=30,  # denoising steps (lower = faster)
    guidance_scale=7.5,      # prompt strength, higher = more stable, lower = more random
    height=384,              # 384 fits 6 GB; try 512 if VRAM allows
    width=384,
).images[0]

out_path = "../assets/sd_astronaut2.png"
image.save(out_path)
display(image)
Output of the code above, same image shown at the top of this article
This is the same image shown at the top of this article. Not bad for 6 GB VRAM and 384x384. Look at the results, it looks fun :)
Prompt Gallery
Let's try a few different prompts with the same pipeline, and put the results in a grid. Same pipe object, just calling it in a loop, no need to reload anything:
from PIL import Image

prompts = [
    "a cozy cabin in the woods, oil painting",
    "a cyberpunk street market at night, neon lights",
    "a watercolor painting of a lighthouse on a cliff",
    "a corgi wearing sunglasses, studio photo",
]

generator = torch.Generator(device="cpu").manual_seed(42)  # fixed seed, same for every prompt

images = []
for p in prompts:
    img = pipe(
        p,
        num_inference_steps=25,
        guidance_scale=7.5,
        height=384,
        width=384,
        generator=generator,
    ).images[0]
    images.append(img)

# paste the 4 images into a 2x2 grid
grid = Image.new("RGB", (384 * 2, 384 * 2))
for i, img in enumerate(images):
    grid.paste(img, ((i % 2) * 384, (i // 2) * 384))

grid.save("../assets/prompt_grid.png")
display(grid)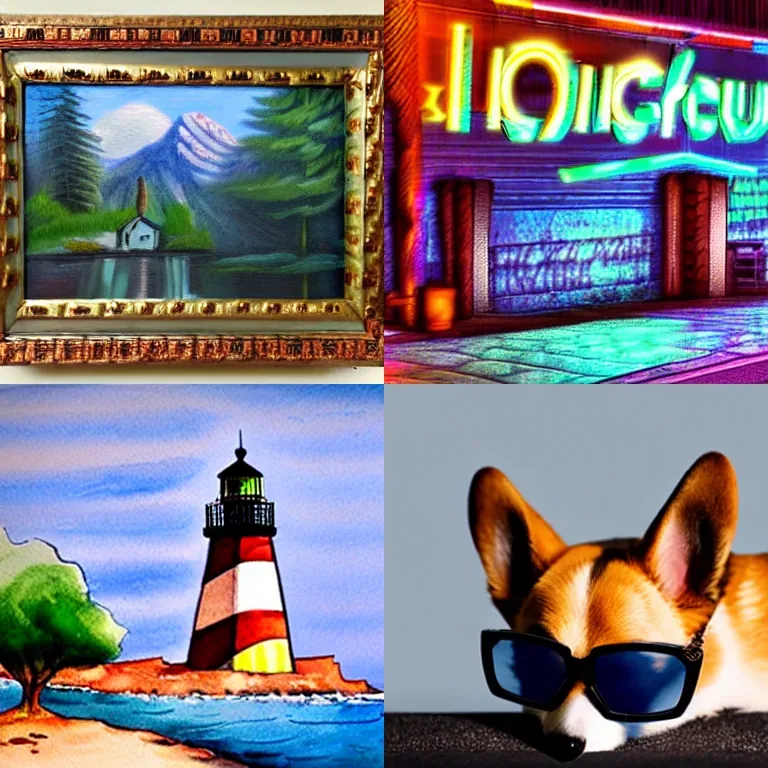
Four Stable Diffusion generations, cabin painting, cyberpunk street, watercolor lighthouse, corgi with sunglasses
The oil painting and watercolor prompts came out really clean, the cyberpunk one is a bit noisy but that's expected from v1.4 at this resolution. The corgi is my favorite one honestly.
Guidance Scale Comparison
One parameter that's worth understanding is guidance_scale. It controls how strictly the model follows your prompt. This value completely depends on your purpose.
Low values give more random/creative results, high values stick closer to the text but can look oversaturated. Let's keep the prompt and seed fixed, and only change this value:
from PIL import Image

prompt = "a fantasy castle on a floating island, digital art"
scales = [3, 7.5, 15]

scale_images = []
for s in scales:
    generator = torch.Generator(device="cpu").manual_seed(123)  # same seed for every scale
    img = pipe(
        prompt,
        num_inference_steps=25,
        guidance_scale=s,
        height=384,
        width=384,
        generator=generator,
    ).images[0]
    scale_images.append(img)

strip = Image.new("RGB", (384 * len(scale_images), 384))
for i, img in enumerate(scale_images):
    strip.paste(img, (i * 384, 0))

strip.save("../assets/guidance_scale_comparison.png")
display(strip)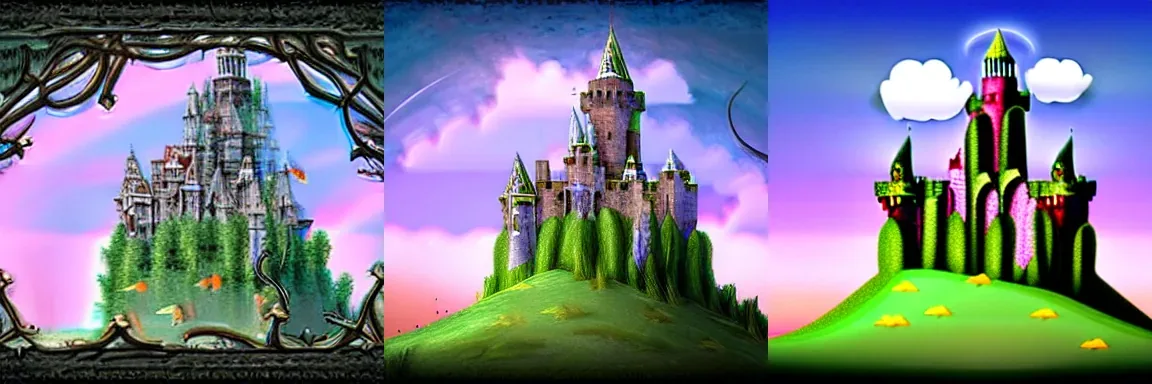
Same prompt and seed, guidance_scale 3, 7.5, and 15 left to right
Left to right this is guidance_scale 3, 7.5, and 15. At 3 the castle barely looks like a castle, the ground part is weird. There are snake like objects. At 7.5 it's clean and follows the prompt well. At 15 the colors get pushed harder, more saturated, a bit less natural. As we can see from these 3 generated images, 7.5 is the default for a reason.
Okay that's it from me, see you in another article, babayyyyy :)