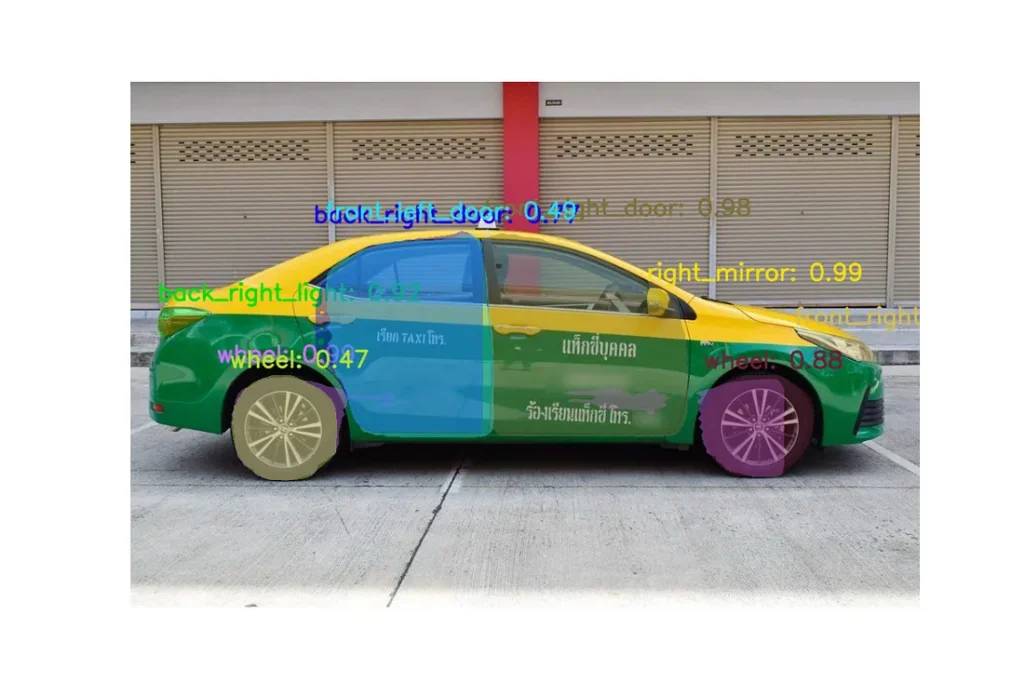
Physical Address
304 North Cardinal St.
Dorchester Center, MA 02124
Physical Address
304 North Cardinal St.
Dorchester Center, MA 02124
→ Step-by-step guide for training Mask R-CNN instance segmentation models in PyTorch with any dataset.
Segmentation is an important part of computer vision, it has different applications in areas like medical imaging, identifying small objects, Autonomous Driving, Robotics, and more. It is pretty much used everywhere, and as time progresses, new models are announced. Among these models, there is one that nearly everybody has heard its name at least once, and it is Mask-RCNN.
In this article, I will share my pipeline for training custom Mask R-CNN instance segmentation models with PyTorch
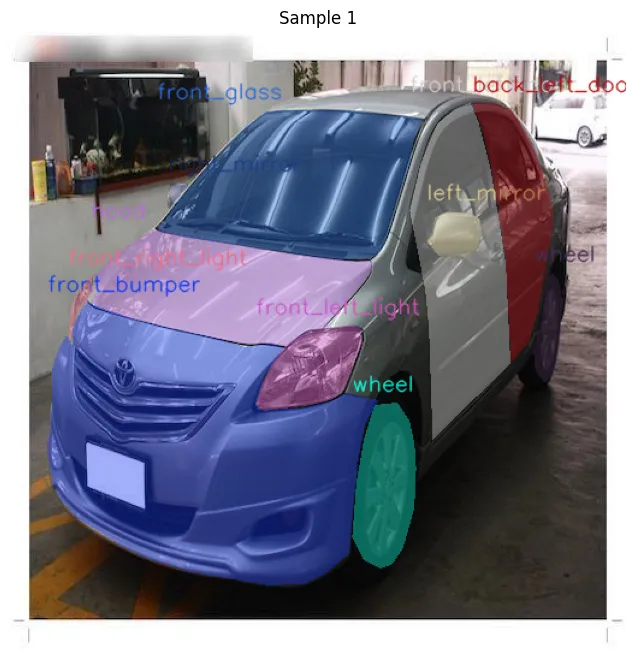
Also, I have a YouTube video about this article, you can watch it.
By the way, it is very similar to training an Object Detection model with Faster R-CNN models. I have an article about it(article link), and the steps are nearly the same, just a few things are different.
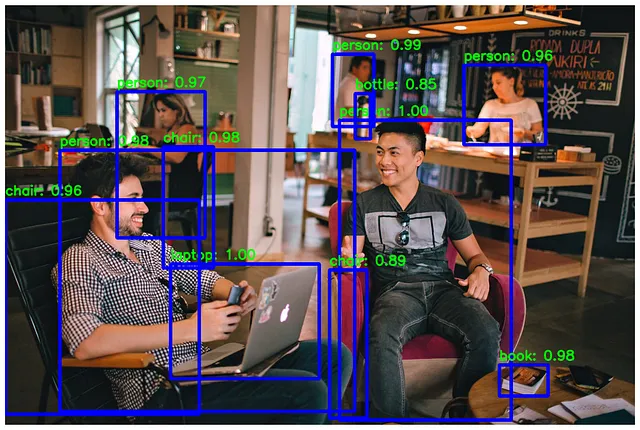
Mask R-CNN gives 3 outputs:
Super cool right, you have so many option to do with the output of a Mask R-CNN instance segmentaiton model
You can use this pipeline with any dataset, but there is one important rule: the dataset format must be the same as COCO format, and the good news is that this is the most popular format. Even if the format is different, still this pipeline will work with some tweaks.
If you just started to train models, I would not recommend you to prepare your own dataset from scratch; it would be more healthy to find a dataset from the internet, from websites like Kaggle or Roboflow.
These websites have thousands of datasets that people like you published, so it is very likely to find a dataset that fits your task.
Roboflow is more user-friendly than kaggle; it allows you to export a dataset in any format. On Kaggle, you can’t do this—you will download a dataset, and the format will be the same as the data owner’s format.
I found my dataset randomly from internet, if you want to use same dataset with me you can check this github link
I have a GPU-supported PyTorch environment, and I will train it locally on my computer. If you don’t have a GPU-supported PyTorch environment, you can use Google Colab or Kaggle; but I recommend you to use Kaggle, it is totally free and it doesn’t have much restriction.
If you use Kaggle or Colab, most of the libraries are preinstalled, so super cool, right?
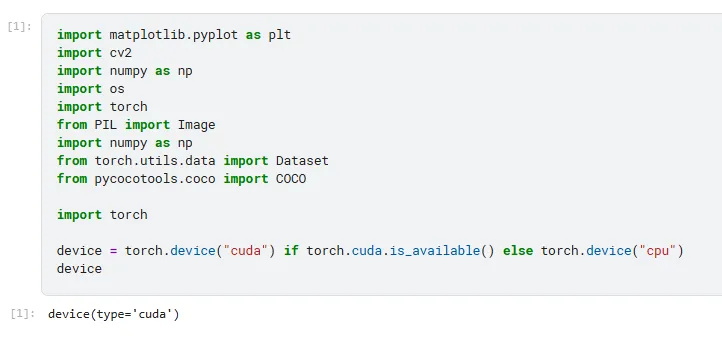
Okay, it is time for training an instance segmentation Mask R-CNN model with PyTorch with a custom dataset, let’s begin.
Without GPU support, training process might take more than a week even with a small dataset, and I dont recommend that for your mental health.
import matplotlib.pyplot as plt
import cv2
import os
import torch
from PIL import Image
import numpy as np
from torch.utils.data import Dataset
from pycocotools.coco import COCO

if torch.cuda.is_available():
    device=torch.device("cuda")
else:
    device=torch.device("cpu")

print(device)
"""
Output must be--> device(type='cuda')
"""
If you have a different dataset format other than COCO, you need to change some lines based on specific format. You can get help from ChatGPT for this.
# Custom PyTorch Dataset to load COCO-format annotations and images
class CocoSegmentationDataset(Dataset):
    # Init function: loads annotation file and prepares list of image id's
    def __init__(self, root_dir, annotation_file, transforms=None):
        """
        root_dir: path to the folder containing images (e.g. car_parts_dataset/train/)
        annotation_file: path to the COCO annotations (e.g. car_parts_dataset/train/_annotations.coco.json)
        """
        self.root_dir = root_dir  # Directory where images are stored
        self.coco = COCO(annotation_file)  # Load COCO annotations
        self.image_ids = list(self.coco.imgs.keys())  # Extract all image IDs
        self.transforms = transforms  # Optional image transformations

    # Returns total number of images
    def __len__(self):
        return len(self.image_ids)  # Total number of images

    # Fetches a single image and its annotations
    def __getitem__(self, idx):
        image_id = self.image_ids[idx]  # Get image ID from list
        image_info = self.coco.loadImgs(image_id)[0]  # Load image info (e.g. filename)
        image_path = os.path.join(self.root_dir, image_info["file_name"])  # Construct full path
        image = Image.open(image_path).convert("RGB")  # Load and convert image to RGB

        # Load all annotations for this image
        annotation_ids = self.coco.getAnnIds(imgIds=image_id)  # Get annotation IDs for image
        annotations = self.coco.loadAnns(annotation_ids)  # Load annotation details

        # Extract segmentation masks, bounding boxes and labels from annotations
        boxes = []  # List to store bounding boxes
        labels = []  # List to store category labels
        masks = []  # List to store segmentation masks

        for ann in annotations:
            xmin, ymin, w, h = ann['bbox']  # Get bounding box in COCO format (x, y, width, height)
            xmax = xmin + w  # Calculate bottom-right x
            ymax = ymin + h  # Calculate bottom-right y
            boxes.append([xmin, ymin, xmax, ymax])  # Append box in (xmin, ymin, xmax, ymax) format
            labels.append(ann['category_id'])  # Append category ID
            mask = self.coco.annToMask(ann)  # Convert segmentation to binary mask
            masks.append(mask)  # Append mask

        # Convert annotations to PyTorch tensors
        boxes = torch.as_tensor(boxes, dtype=torch.float32)  # Bounding boxes as float tensors
        labels = torch.as_tensor(labels, dtype=torch.int64)  # Labels as int64 tensors
        masks = torch.as_tensor(masks, dtype=torch.uint8)  # Masks as uint8 tensors
        area = torch.as_tensor([ann['area'] for ann in annotations], dtype=torch.float32)  # Area of each object
        iscrowd = torch.as_tensor([ann.get('iscrowd', 0) for ann in annotations], dtype=torch.int64)  # Crowd annotations

        # store everything in a dictionary
        target = {
            "boxes": boxes,  # Bounding boxes
            "labels": labels,  # Object labels
            "masks": masks,  # Segmentation masks
            "image_id": image_id,  # Image ID
            "area": area,  # Area of each object
            "iscrowd": iscrowd  # Crowd flags
        }

        # Apply transforms
        if self.transforms:
            image = self.transforms(image)  # Apply any data augmentations or preprocessing

        # Return the processed image and its annotations
        return image, target  # Return tuple of image and annotation dictionary
Don’t forget to change:
image_dir annotation_path
from torchvision.transforms import ToTensor
from torch.utils.data import DataLoader

# Transform PIL image --> PyTorch tensor
def get_transform():
    return ToTensor()

# Load training dataset
train_dataset = CocoSegmentationDataset(
    root_dir='car_parts_dataset/train',
    annotation_file='car_parts_dataset/train/_annotations.coco.json',
    transforms=get_transform()  # define this if needed
)

# Load validation dataset
valid_dataset = CocoSegmentationDataset(
    root_dir='car_parts_dataset/valid',
    annotation_file='car_parts_dataset/valid/_annotations.coco.json',
    transforms=get_transform()
)

# Load dataset with DataLoaders, DataLoader is used to load data in batches.
train_loader = DataLoader(train_dataset, batch_size=2, shuffle=True, collate_fn=lambda x: tuple(zip(*x)))
val_loader = DataLoader(valid_dataset, batch_size=1, shuffle=False, collate_fn=lambda x: tuple(zip(*x)))
# Label list
CLASS_NAMES = [ " ",
    "back_bumper", "back_glass", "back_left_door", "back_left_light", "back_right_door",
    "back_right_light", "front_bumper", "front_glass", "front_left_door", "front_left_light",
    "front_right_door", "front_right_light", "hood", "left_mirror", "right_mirror",
    "tailgate", "trunk", "wheel"
]

# Get one batch
images, targets = next(iter(train_loader))

# loop through one batch and draw bounding boxes and labels
for i in range(len(images)):
    # CxHxW --> HxWxC
    image = images[i].permute(1, 2, 0).cpu().numpy()
    # Rescale
    image = (image * 255).astype(np.uint8)
    # Convert RGB to BGR
    image = cv2.cvtColor(image, cv2.COLOR_RGB2BGR)
    overlay = image.copy()

    # Extract masks, bounding boxes, and labels for the current image
    masks = targets[i]['masks'].cpu().numpy()
    boxes = targets[i]['boxes'].cpu().numpy()
    labels = targets[i]['labels'].cpu().numpy()

    for j in range(len(masks)):
        mask = masks[j]
        box = boxes[j]
        label_id = labels[j]

        # Get class name from mapping
        class_name = CLASS_NAMES[label_id - 1]  # assuming 1-based labels

        # Random color
        color = np.random.randint(0, 255, (3,), dtype=np.uint8).tolist()

        # Alpha blend mask
        colored_mask = np.zeros_like(image, dtype=np.uint8)
        for c in range(3):
            colored_mask[:, :, c] = mask * color[c]
        alpha = 0.4
        overlay = np.where(mask[..., None],
                           ((1 - alpha) * overlay + alpha * colored_mask).astype(np.uint8),
                           overlay)

        # Draw label
        x1, y1, x2, y2 = map(int, box)
        cv2.putText(overlay, class_name, (x1, y1 - 10), cv2.FONT_HERSHEY_SIMPLEX,
                    0.6, color, 1, lineType=cv2.LINE_AA)


    # Show the result
    plt.figure(figsize=(10, 8))
    plt.imshow(cv2.cvtColor(overlay, cv2.COLOR_BGR2RGB))
    plt.axis("off")
    plt.title(f"Sample {i + 1}")
    plt.show()
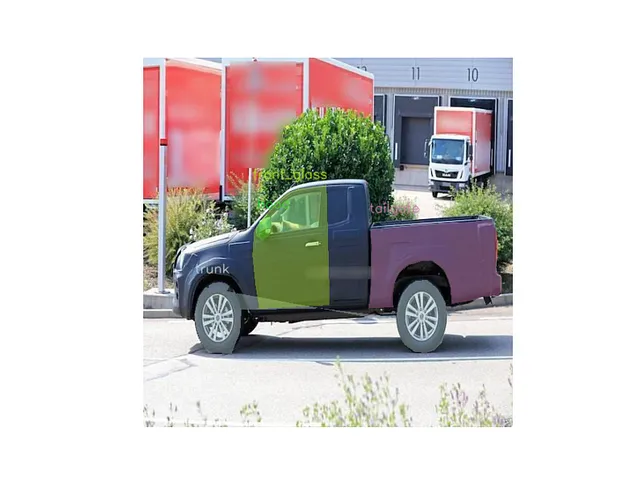
import torchvision
from torchvision.models.detection import MaskRCNN
from torchvision.models.detection.mask_rcnn import MaskRCNNPredictor
from torchvision.models.detection.faster_rcnn import FastRCNNPredictor

# Load a pre-trained Mask R-CNN model with a ResNet-50 FPN backbone
model = torchvision.models.detection.maskrcnn_resnet50_fpn(pretrained=True)

# Determine the number of classes (including background) from training dataset
# COCO format includes category IDs, and we add +1 for background
num_classes = len(train_dataset.coco.getCatIds()) + 1

# Replace the existing box predictor with a new one for our number of classes
# in_features_box: number of input features to the classification layer
in_features_box = model.roi_heads.box_predictor.cls_score.in_features
model.roi_heads.box_predictor = FastRCNNPredictor(in_features_box, num_classes)

# Replace the existing mask predictor with a new one for our number of classes
# in_features_mask: number of input channels to the first convolutional layer
in_features_mask = model.roi_heads.mask_predictor.conv5_mask.in_channels
hidden_layer = 256
model.roi_heads.mask_predictor = MaskRCNNPredictor(in_features_mask, hidden_layer, num_classes)

# Move the model to the specified device (e.g., GPU) for training or inference
model.to(device)
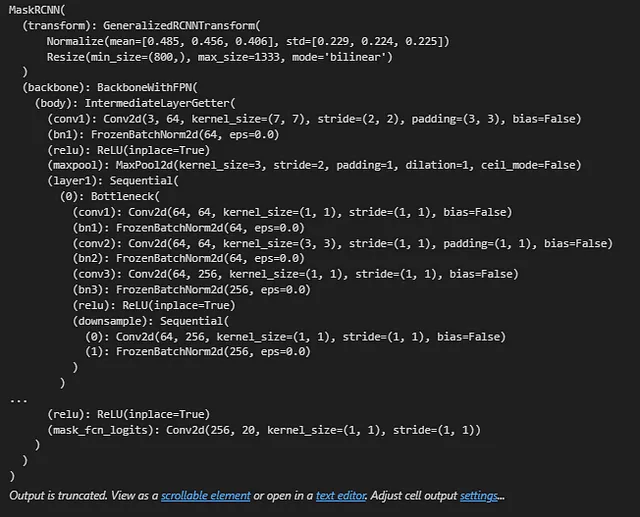
You can change this parameters:
lr(learning rate) momentumweight_decay
# Get parameters that require gradients (the model's trainable parameters)
params = [p for p in model.parameters() if p.requires_grad]

# Define the optimizer SGD(Stochastic Gradient Descent)
optimizer = torch.optim.SGD(params, lr=0.005,
                            momentum=0.9, weight_decay=0.0005)
First clone PyTorch vision repository from terminal:git clone https://github.com/pytorch/vision.git
Then copy these files to folder where your training script is located:
from engine import train_one_epoch, evaluate

# Number of epochs for training
num_epochs = 10

# Loop through each epoch
for epoch in range(num_epochs):
    print(f"\nEpoch {epoch + 1}/{num_epochs}")

    # Train the model for one epoch, printing status every 25 iterations
    train_one_epoch(model, optimizer, train_loader, device, epoch, print_freq=25)  # Using train_loader for training

    # Evaluate the model on the validation dataset
    evaluate(model, val_loader, device=device)  # Using val_loader for evaluation

    # Optionally, save the model checkpoint after each epoch
    torch.save(model.state_dict(), f"model_epoch_{epoch + 1}.pth")
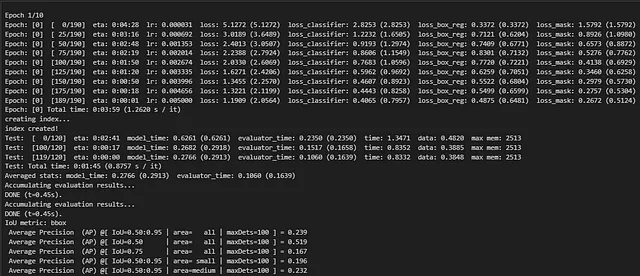
Dont forget to change img_path
Load Trainfrom torchvision import transforms, models

# Load Mask R-CNN model with correct number of classes
model = models.detection.maskrcnn_resnet50_fpn(pretrained=False, num_classes=num_classes)

# Load your trained weights
model.load_state_dict(torch.load(r"model_epoch_10.pth"))
model.eval()

# Load image with OpenCV and convert to RGB
img_path = r"car_parts_dataset\valid\te11_jpg.rf.6ee33aef6e1d0ed28852f03297d7a5ee.jpg"  # Change this path
image_bgr = cv2.imread(img_path)
image_rgb = cv2.cvtColor(image_bgr, cv2.COLOR_BGR2RGB)
image_pil = Image.fromarray(image_rgb)

# Transform image to tensor and add batch dimension
transform = transforms.Compose([transforms.ToTensor()])
image_tensor = transform(image_pil).unsqueeze(0)

# Inference
with torch.no_grad():
    predictions = model(image_tensor)

# Extract masks, boxes, labels, and scores
masks = predictions[0]['masks']       # [N, 1, H, W]
boxes = predictions[0]['boxes']
labels = predictions[0]['labels']
scores = predictions[0]['scores']

threshold = 0.4  # Confidence threshold

# Use overlay for blending masks over image
overlay = image_bgr.copy()

for i in range(len(masks)):
    if scores[i] > threshold:
        # Convert mask to uint8 numpy array (H,W)
        mask = masks[i, 0].mul(255).byte().cpu().numpy()
        mask_bool = mask > 127  # binary mask for indexing
        box = boxes[i].cpu().numpy().astype(int)
        class_name = CLASS_NAMES[labels[i]]
        score = scores[i].item()

        # Generate random color (BGR)
        color = np.random.randint(0, 255, (3,), dtype=np.uint8).tolist()

        # Create colored mask with the random color
        colored_mask = np.zeros_like(image_bgr, dtype=np.uint8)
        for c in range(3):
            colored_mask[:, :, c] = mask_bool * color[c]

        # Alpha blend the colored mask onto the overlay
        alpha = 0.4
        overlay = np.where(mask_bool[:, :, None],
                           ((1 - alpha) * overlay + alpha * colored_mask).astype(np.uint8),
                           overlay)

        # Draw bounding box and label text on overlay
        x1, y1, x2, y2 = box
        cv2.putText(overlay, f"{class_name}: {score:.2f}", (x1, y1 - 10),
                    cv2.FONT_HERSHEY_SIMPLEX, 1, color, 2, lineType=cv2.LINE_AA)

# Show the result using matplotlib (convert BGR -> RGB)
result_rgb = cv2.cvtColor(overlay, cv2.COLOR_BGR2RGB)

plt.figure(figsize=(12, 8))
plt.imshow(result_rgb)
plt.axis('off')
plt.show()ed Model and Make Prediction on Images
