Physical Address
304 North Cardinal St.
Dorchester Center, MA 02124
Physical Address
304 North Cardinal St.
Dorchester Center, MA 02124
→ Step-by-step guide for training DETR(Detection Transformer) object detection models in PyTorch with any dataset.
When it comes to object detection, there are popular models like YOLO, Faster R-CNN, SSD, Retinanet, and these models are solely based on convolutional neural networks(CNN). Feature extraction is done by CNNs, and prediction is made by prediction heads. Well, DETR(DEtection TRansformer) doesn’t work like this. DETR still uses CNNs for feature extraction, but there are transformers in the core of DETR. There are additional encoders and decoders.
In this article, I will share a pipeline for training a DETR object detection model with any dataset.

Also, I have a YouTube video about this article, you can watch it.
Before diving into the code, I would like to briefly discuss object detection in general. There are single-stage detectors, two-stage detectors, and transformer-based detectors.
CNN backbone extract feature maps, and class + bounding box prediction are made directly from these maps. This process is done on a single CNN network, which is why it is called single-stage.
Since everything is done in a single network, single-stage detectors are fast. They are perfect for real-time object detection.

CNN backbone extracts features, and FPN (Feature Pyramid Network) generates feature maps from different scales.
First stage: Region proposals
Second stage: Class + bounding box predictions made from different-sized feature maps
Two-stage detectors are perfect for small object detection. Feature maps from different scales help the model to detect small objects more effectively. When it comes to real-time performance, two-stage detectors are not optimal.

CNN backbone extract features. Encoder learns about global image context(relation between different parts of image,self-attention) from these features, and decoder transforms learned features to make class + bounding box prediction.
Okay, enough talking about models, but before training a DETR model, we need to setup an environment and prepare a dataset.
For training a Deep Learning model, you need to have GPU-supported PyTorch environment. I have an article about how to create GPU GPU-supported PyTorch environment. You can read it. If you don’t want to spend time on it, you can always use servers like Kaggle or Google Colab, they offer free servers with a GPU with small limitations. I strongly recommend that you use Kaggle; it offers more training time.
After creating a GPU-supported conda environment, there are a few additional steps. First, you need to clone the DETR repository
git clone https://github.com/facebookresearch/detr.git
Install COCO dependencies.
conda install cython scipy
pip install -U 'git+https://github.com/cocodataset/cocoapi.git#subdirectory=PythonAPI'
If you get any error related to numpy, you can try to downgrade numpy: pip install numpy==1.23
Okay, installation is finished, now it’s time for the dataset.
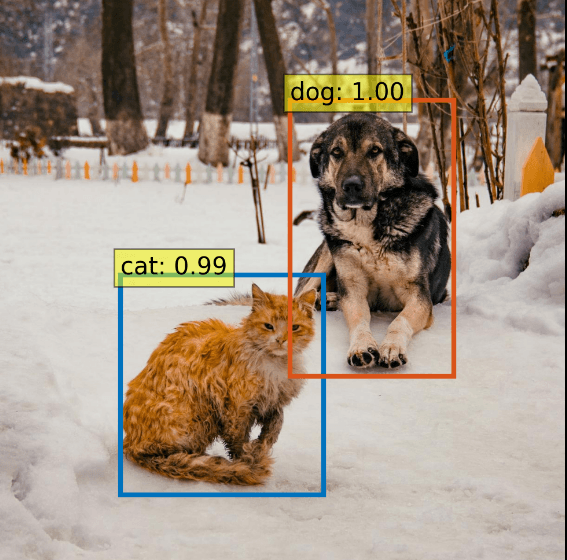
I found a dataset from Roboflow about cat and dog detection(link), but you can use any dataset. There is only one important point: the format of the dataset has to be in COCO format.

If you don’t want to change the code inside the repository files, rename your dataset folders to train2017, val2017, and annotations.
Training is not complex; there are already files for training. We will use the main.py file from the DETR repository that we just cloned. There are different pretrained models, and I will use detr-r50-e632da11.pth. I will store my model under the pretrained-weights folder that I created. You can directly download models from the DETR repository as well.
mkdir -p pretrained-weights
wget https://dl.fbaipublicfiles.com/detr/detr-r50-e632da11.pth -O pretrained-weights/detr-r50-e632da11.pth

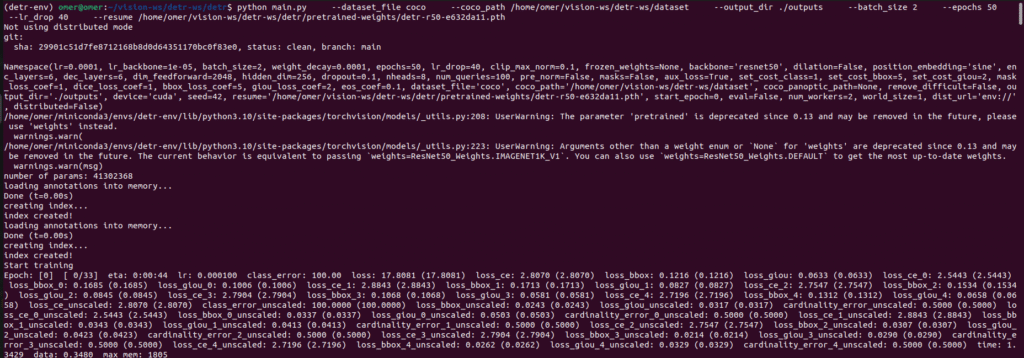
Open a terminal, activate your environment, and run the command below for training. Don’t forget to change coco_path.
python main.py --dataset_file coco --coco_path /home/omer/vision-ws/detr-ws/dataset --output_dir ./outputs --batch_size 2 --epochs 30 --lr_drop 40 --resume pretrained-weights/detr-r50-e632da11.pth

It might take some time depending on your dataset and GPU power. You can change the learning rate, epoch number, batch size, and other things.

After training is finished, you can find model files inside the outputs folder.
Now, it is time for prediction on test images. You can use the same environment that you used for training.
First, we need to import libraries.
from PIL import Image
import matplotlib.pyplot as plt
%config InlineBackend.figure_format = 'retina'

import torch
from torch import nn
from torchvision.models import resnet50
import torchvision.transforms as T
torch.set_grad_enabled(False);
Define constant variables.
# Custom classes for dog/cat detection
CLASSES = [
    'N/A', 'cat', 'dog'
]

# colors for visualization, you can use your own colors here
COLORS = [[0.000, 0.447, 0.741], [0.850, 0.325, 0.098], [0.929, 0.694, 0.125],
          [0.494, 0.184, 0.556], [0.466, 0.674, 0.188], [0.301, 0.745, 0.933]]
Define functions for processing images, adjusting output, and displaying output.
# standard PyTorch mean-std input image normalization
transform = T.Compose([
    T.Resize(600), # resize image, you can adjust this value
    T.ToTensor(), # convert to tensor
    T.Normalize([0.485, 0.456, 0.406], [0.229, 0.224, 0.225]) # normalize image
])

# for output bounding box post-processing
def box_cxcywh_to_xyxy(x):
    x_c, y_c, w, h = x.unbind(1)
    b = [(x_c - 0.5 * w), (y_c - 0.5 * h),
         (x_c + 0.5 * w), (y_c + 0.5 * h)]
    return torch.stack(b, dim=1)

# Function to rescale bounding boxes to the original image size
def rescale_bboxes(out_bbox, size):
    img_w, img_h = size
    b = box_cxcywh_to_xyxy(out_bbox)
    b = b * torch.tensor([img_w, img_h, img_w, img_h], dtype=torch.float32)
    return b

# Function to plot results
def plot_results(pil_img, prob, boxes):
    plt.figure(figsize=(12,8))
    plt.imshow(pil_img)
    ax = plt.gca()
    colors = COLORS * 100
    for p, (xmin, ymin, xmax, ymax), c in zip(prob, boxes.tolist(), colors):
        ax.add_patch(plt.Rectangle((xmin, ymin), xmax - xmin, ymax - ymin,
                                   fill=False, color=c, linewidth=3))
        cl = p.argmax()
        text = f'{CLASSES[cl]}: {p[cl]:0.2f}'
        ax.text(xmin, ymin, text, fontsize=15,
                bbox=dict(facecolor='yellow', alpha=0.5))
    plt.axis('off')
    plt.show()
Load trained model, and don’t forget to change checkpoint_path if it is different.
# Load your custom trained model
import sys
sys.path.append('./detr')

from models.detr import build

class Args:
    # Model parameters
    backbone = 'resnet50' # Backbone architecture
    dilation = False
    position_embedding = 'sine' # Type of positional embedding
    num_classes = 2  # cat and dog (background is handled separately)

    # Transformer parameters
    hidden_dim = 256 # dimensionality of the embeddings
    nheads = 8 # Number of attention heads
    num_encoder_layers = 6 # Number of encoder layers
    num_decoder_layers = 6 # Number of decoder layers
    dim_feedforward = 2048 # Dimension of feedforward network
    dropout = 0.1 # Dropout rate
    enc_layers = 6 # Number of encoder layers
    dec_layers = 6 # Number of decoder layers
    pre_norm = False
    num_queries = 100  # Number of object queries

    # Training parameters (needed for model building)
    lr_backbone = 1e-5  # Required by build_backbone

    # Loss coefficients
    set_cost_class = 1
    set_cost_bbox = 5
    set_cost_giou = 2
    mask_loss_coef = 1
    dice_loss_coef = 1
    bbox_loss_coef = 5
    giou_loss_coef = 2
    eos_coef = 0.1

    # Other required parameters
    device = 'cuda' if torch.cuda.is_available() else 'cpu'
    dataset_file = 'coco'  # Required by build function
    masks = False  # No segmentation masks
    aux_loss = True  # Auxiliary decoding losses
    frozen_weights = None

args = Args()

# Build the model
model, criterion, postprocessors = build(args)

# Load your trained checkpoint
checkpoint_path = './detr/outputs/checkpoint.pth'
checkpoint = torch.load(checkpoint_path, map_location=args.device, weights_only=False)
model.load_state_dict(checkpoint['model'], strict=False)
model.to(args.device)
model.eval() # set model to evaluation mode

Run the model on the test image, and display the results.
im = Image.open('testimage.jpg')

# mean-std normalize the input image (batch-size: 1)
img = transform(im).unsqueeze(0)

# Move to device (GPU for faster inference)
device = 'cuda' if torch.cuda.is_available() else 'cpu'
img = img.to(device)

# run the model on the input image
outputs = model(img)

# keep only predictions with 0.5 confidence or higher
probas = outputs['pred_logits'].softmax(-1)[0, :, :-1]
keep = probas.max(-1).values > 0.5

# convert boxes from [0; 1] to image scales
bboxes_scaled = rescale_bboxes(outputs['pred_boxes'][0, keep].cpu(), im.size)

# plot the results
plot_results(im, probas[keep].cpu(), bboxes_scaled)

Okay, by following this pipeline, you can train a DETR object detection model with any dataset. See you soon 🙂