A few months ago, I shared an article about how to train a custom RF-DETR object detection model. I think that was fun because, especially for beginners, when they want to detect some objects, YOLO is the most preferable model because of how easy and clear things are. Ultralytics has a great impact on this as well. But it is the same for RF-DETR; everything is quite simple. You don't have to stick to YOLO every time; it is always better to try different things. In this article, I will show you how to segment objects with RF-DETR instance segmentation models.
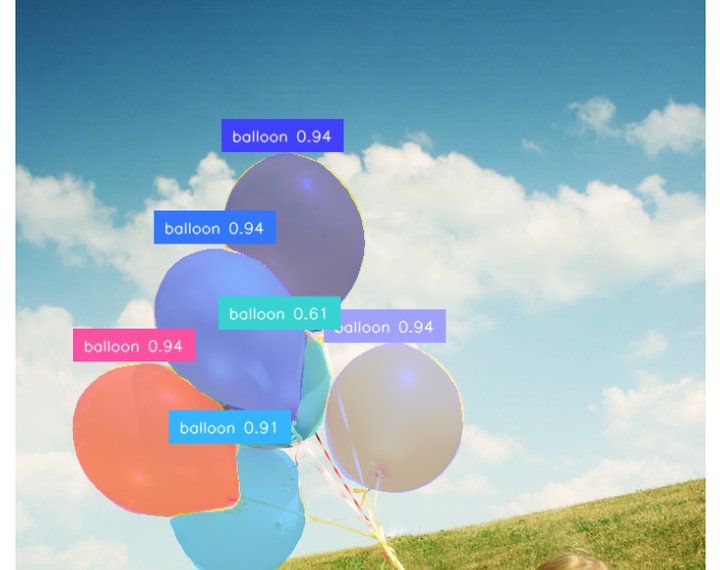
RF-DETR-Seg segmenting 6 balloons, each with its own mask color
The pipeline is similar to the RF-DETR object detection one. There are 4 main steps:
-
Installation Guide
-
Dataset Preparation
-
Training
-
Testing the Model (Inference)
Also, I have a YouTube video about this article, you can watch it.
Installation Guide
Make sure that you have NVIDIA drivers installed by running nvidia-smi on your terminal, then let's create a conda environment and activate it:
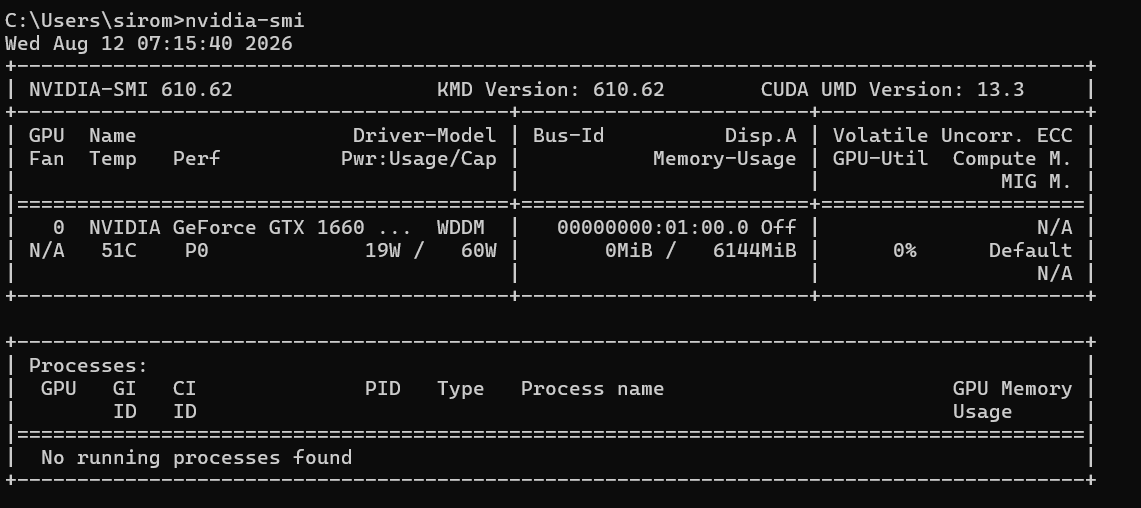
nvidia-smi output, CUDA version might differ: CUDA 11.8, 12.1, 12.3, 12.6, 12.9, 13.0
conda create -n rfdetr_seg_env python=3.10 -y
conda activate rfdetr_seg_env
Now, let's install PyTorch with GPU-support. I used CUDA 12.6. If you get any errors, I already explained this in detail in a separate article, you can check it:
pip install torch torchvision torchaudio --index-url https://download.pytorch.org/whl/cu126Check CUDA is working:
import torch
print(torch.__version__, torch.cuda.is_available())
If it prints True, you are good to go. Now let's clone the rf-detr repository, and install it:
git clone https://github.com/roboflow/rf-detr.git
cd rf-detr
pip install -e .
Few more libraries, just supervision this time. The object detection article also installs inference, but you don't actually need it for training or local inference, it pulls a huge dependency tree (EasyOCR, GroundingDINO, SAM...) and the install takes forever, so I skip it here:
pip install supervisionFor training, install these as well (if you only want to use pretrained models you can skip this):
pip install -e ".[train,loggers]"Okay, installation is done. Let's test the environment by loading a pretrained segmentation checkpoint:
import torch
from rfdetr import RFDETRSegNano

device = "cuda" if torch.cuda.is_available() else "cpu"
print(f"Using device: {device}")

# pretrained segmentation checkpoint (downloads automatically on first run)
model = RFDETRSegNano(device=device)
Output:
Using device: cuda
[INFO] rf-detr - File C:\Users\sirom\.roboflow\models\rf-detr-seg-nano.pt already exists with correct MD5 hash.
It downloaded the pretrained rf-detr-seg-nano.pt weights on first run, and loaded them on the GPU. The environment is ready.
Dataset Preparation
Same rule as object detection: your dataset must be in COCO JSON format, with train and valid folders (test is optional). The only difference for segmentation is that each annotation also needs a segmentation field, a polygon (list of x, y points) around the object, not just a bbox.
I picked a small dataset for this one, the balloon dataset from the Mask R-CNN repo, 61 train + 13 valid images, 74 in total. I chose a small dataset because I don't want to spend time on training that much, but even if there are like 10000 images, the pipeline is the same.
One thing: the balloon dataset is in VIA (VGG Image Annotator) format, so the format must be changed for RF-DETR. If your dataset is not already in COCO format, you have to write a small script to convert it, the same as I said in the object detection article for YOLO/Pascal VOC datasets. Here I converted the VIA polygons to COCO segmentation format, computing the bbox and area from the polygon points. Depending on your format, you might have to make some adjustments:
def polygon_to_bbox(xs, ys):
    x_min, x_max = min(xs), max(xs)
    y_min, y_max = min(ys), max(ys)
    return x_min, y_min, x_max - x_min, y_max - y_min

def polygon_area(xs, ys):
    # shoelace formula
    n = len(xs)
    area = 0.0
    for i in range(n):
        j = (i + 1) % n
        area += xs[i] * ys[j] - xs[j] * ys[i]
    return abs(area) / 2.0
After conversion:
train: 61 images, 255 mask annotations
valid: 13 images, 50 mask annotations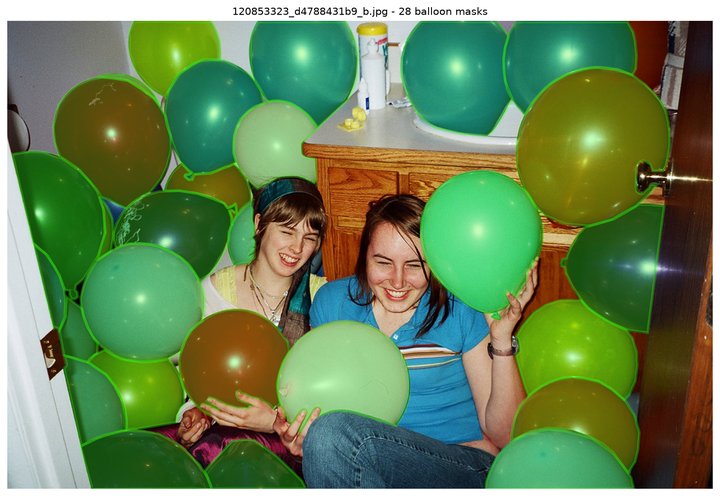
One training image with all 28 balloon masks drawn on top
Training
RFDETRSegNano is the smallest of the new RF-DETR-Seg family (Nano, Small, Medium, Large, XLarge, 2XLarge), the same idea as RFDETRNano in the detection article. I have 6GB VRAM, and I will stick with the Nano model.
One thing specific to the Nano segmentation model: resolution has to be divisible by 12, its native resolution is 312, so I kept it there.
from rfdetr import RFDETRSegNano

# 1. Initialize
model = RFDETRSegNano(device="cuda")

# 2. Start Fine-Tuning
model.train(
    dataset_dir="dataset",                 # Dataset path
    epochs=30,
    batch_size=2,                          # Images per batch
    grad_accum_steps=4,                    # Effective batch size = 2 * 4 = 8
    resolution=312,                        # Native RFDETRSegNano resolution
    output_dir="output/rfdetr_seg_balloon",# Checkpoints + logs
)
Training took around 50 minutes for 30 epochs on my GTX 1660 Ti. This is the result on the validation set, best checkpoint (epoch 25):
box mAP50: 92.9%    box mAP50-95: 76.9%
mask mAP50: 95.4%   mask mAP50-95: 74.0%
precision: 93.9%    recall: 92.0%
Not bad at all for 61 training images and 30 epochs. Now it is time for testing the model.
Testing the Model (Inference)
First, we need to load our trained model. Then we read a test image and run the model. The only difference from object detection is MaskAnnotator instead of BoxAnnotator, since now we have masks, not just boxes.
import glob

import matplotlib.pyplot as plt
import supervision as sv
from rfdetr.detr import RFDETR

# 1. Initialize the model from the checkpoint
checkpoint_path = "output/rfdetr_seg_balloon/checkpoint_best_total.pth"
model = RFDETR.from_checkpoint(checkpoint_path, device="cuda")

# 2. Path to a validation image (the balloon photo from the top of this article)
image_path = "dataset/valid/3825919971_93fb1ec581_b.jpg"

# 3. Run prediction, this handles pre/post-processing (NMS-free) internally
results = model.predict(image_path, threshold=0.5)

# 4. Class names come from the trained model metadata
class_names = model.class_names

# 5. Format labels for display
labels = [
    f"{class_names[class_id]} {confidence:.2f}"
    for class_id, confidence in zip(results.class_id, results.confidence)
]

# results.metadata["source_image"] holds the image as a NumPy array
image = results.metadata["source_image"]

# color_lookup=INDEX gives each balloon its own mask color instead of one color per class
mask_annotator = sv.MaskAnnotator(opacity=0.6, color_lookup=sv.ColorLookup.INDEX)
label_annotator = sv.LabelAnnotator(color_lookup=sv.ColorLookup.INDEX)

annotated_frame = mask_annotator.annotate(scene=image.copy(), detections=results)
annotated_frame = label_annotator.annotate(scene=annotated_frame, detections=results, labels=labels)

plt.imshow(annotated_frame)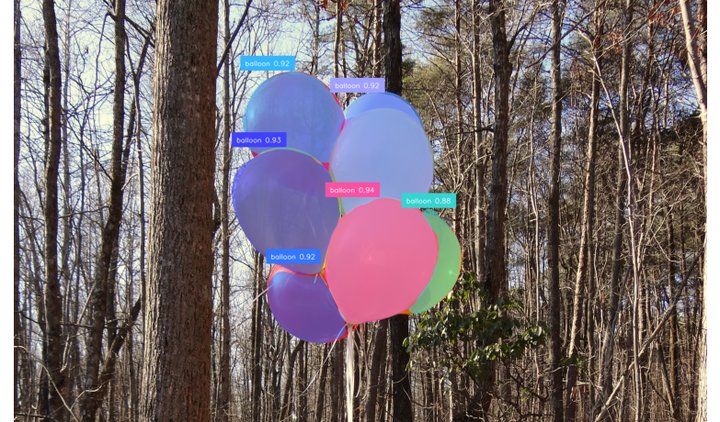
RF-DETR-Seg finding 6 balloons on a second validation image, confidence between 0.88 and 0.94
Okay, that's it from me. babays :)